Nuxt開發經驗分享,讓你踩少點坑!
說明
本文章基於starter-template模板進行講解,面向有vue-cli開發經驗的寶寶
vue init nuxt-community/starter-template

Nuxt
官方文檔
簡單來說,Nuxt就是基於Vue的一個應用框架,採用服務端渲染,讓你的SPA應用(Vue)也可以擁有SEO
生命周期
眾所周知,Vue的生命周期全都跑在客戶端(瀏覽器),而Nuxt的生命周期有些在服務端(Node),客戶端,甚至兩邊都在:
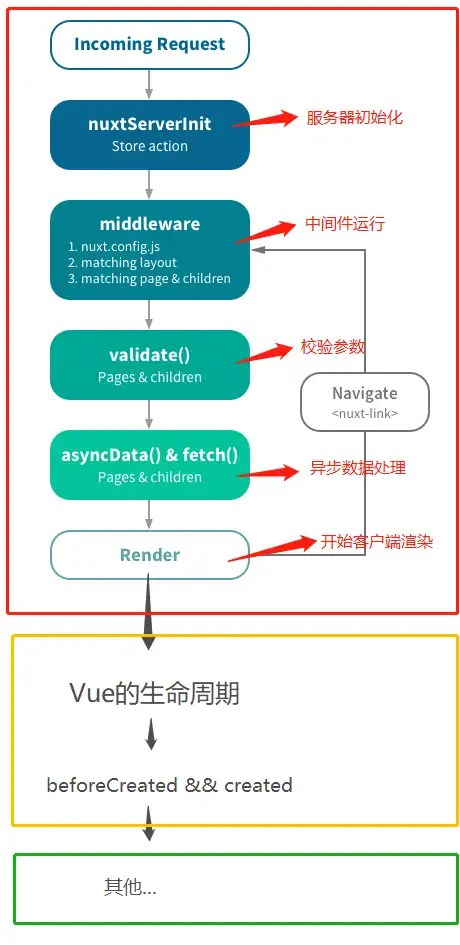 生命周期流程圖,紅框內的是Nuxt的生命周期(運行在服務端),黃框內同時運行在服務端&&客戶端上,綠框內則運行在客戶端
實戰經驗
1. 紅框、黃框內的周期都不存在Window對象
<script> export default { asyncData() { console.log(window) // 服務端報錯 }, fetch() { console.log(window) // 服務端報錯 }, created () { console.log(window) // undefined }, mounted () { console.log(window) // Window {postMessage: ?, blur: ?, focus: ?, close: ?, frames: Window, …} } } </script>
2. 配置錯誤頁面
你可以通過編輯 layouts/error.vue 文件來定製化錯誤頁面.
<template> <div class="container"> <h1 v-if="error.statusCode === 404">頁面不存在</h1> <h1 v-else>應用發生錯誤異常</h1> <nuxt-link to="/">首 頁</nuxt-link> </div> </template> <script> export default { props: [error], layout: blog // 你可以為錯誤頁面指定自定義的布局 } </script>
3. 自定義Loading頁面
nuxt.config.js
module.exports = { loading: ~components/loading.vue }
loading.vue
<template> <div class="loading-page" v-if="loading"> <p>Loading...</p> </div> </template> <script> export default { data: () => ({ loading: false }), methods: { start () { this.loading = true }, finish () { this.loading = false } } } </script>
4. 校驗參數
如果校驗失敗,則自動跳轉到錯誤頁面
<script> export default { validate({ params, query }) { return /^d+$/.test(params.id) // must be number } } </script>
5. Header、Footer等公共組件放哪?
大家都知道,vue-cli入口文件是app.vue,在nuxt開發當中則是**./layout/default.vue**
<template> <div id="app"> <!-- 公共頭部組件 --> <xxx-header></xxx-header> <!-- 路由視圖,相當於router-view --> <nuxt/> <!-- 公共底部組件 --> <xxx-footer></xxx-footer> </div> </template>
6. 沒有keep-alive
由於是服務端渲染,所以不支持組件的keep-alive,那自然activated、deactivated這兩個生命周期也沒了
7. 配置插件
所有插件都寫在**/plugins目錄下,這裡以vue-lazyload**為例
plugins/lazy-load.js
import Vue from vue import VueLazyLoad from vue-lazyload Vue.use(VueLazyLoad, { loading: require(~/assets/images/loading.jpg), error: require(~/assets/images/error.jpg) })
nuxt.config.js
module.expors = { plugins = [ { src: "~/plugins/lazy-load", ssr: false } ] }
8. 使用Axios,並配置全局攔截器,處理跨域
starter-template模板,推薦使用**@nuxtjs/axios、@nuxtjs/proxy**,不需要在plugins配置
安裝依賴
npm install @nuxtjs/axios @nuxtjs/proxy --save
使用、處理跨域
// nuxt.config.js module.exports = { modules: [ @nuxtjs/axios ], // 不需要加入@nuxtjs/proxy axios: { proxy: true, prefix: /api, // baseURL credentials: true, }, proxy: { /api/: { target: http://127.0.0.1:2001, // 代理地址 changeOrigin: true, pathRewrite: { ^/api: }, }, } }
組件中使用
<script> export default { fetch ({ app }) { console.log(app.$axios) }, asyncData ({ app }) { console.log(app.$axios) }, created () { console.log(this.$axios) } } </script>
到此為止,我們並不需要在plugins配置axios,但是如果要設置全局攔截器,那麼就要新建一個/plugins/axios.js
export default function (app) { let axios = app.$axios; // 基本配置 axios.defaults.timeout = 10000 axios.defaults.headers.post[Content-Type] = application/x-www-form-urlencoded // 請求回調 axios.onRequest(config => {}) // 返回回調 axios.onResponse(res => {}) // 錯誤回調 axios.onError(error => {}) }
然後在plugins配置它
module.exports = { plugins = [ { src: "~/plugins/axios", ssr: false }, ] }
9. 默認Meta標籤
nuxt.config.js
module.exports = { head: { title: your project title, meta: [ { charset: utf-8 }, { name: viewport, content: width_=device-width, initial-scale=1 } ], link: [ { rel: stylesheet, href: https://fonts.googleapis.com/css?family=Roboto } ] } }
10. 頁面組件特有的Meta標籤
<script> export default { head () { return { meta: [ { name: keywords, content: 最強王者,今晚吃雞 }, ] } } } </script>
11. 動態路由的Meta標籤填充
遊戲詳情頁面舉例子,由於數據是非同步獲取的,我們需要把數據獲取寫在asyncData鉤子,待數據獲取成功才會渲染該頁面組件
<script> export default { async asyncData ({ app, params }) { let data = await app.$axios.get(`/appinfo/${params.id}`); return { appname: data.appinfo.appname } }, head () { return { meta: [ { name: keywords, content: `${this.appname},無限寶石,無限元寶` }, ] } } } </script>
12. 使用Vuex
nuxt自己集成了vuex,所以不需要安裝,在/store目錄下新建index.js即可使用
import Vuex from vuex let store = () => new Vuex.Store({ state: { token: }, mutations: { setToken (state, token) { state.token = token } } }) export default store
13. 登錄狀態?
vue-cli項目中,我們可以用vuex-persistedstate,它可以使vuex的狀態持久化,頁面刷新都不會丟失,原理當然是localStorage啦!當然我更喜歡用vue-cookies進行保存token,問題來了,nuxt項目怎麼保存登錄狀態呢?當然上面這兩種方法我們都可以使用,但是有個問題,由於在created鉤子中不存在window對象(獲取cookie、localStorage都需要window對象),當你需要判斷是否存在token的時候,你必須要在mounted進行操作,這說明頁面進來的一瞬間你無法得知是否已經登錄了,這會導致顯示用戶名、組件顯示於隱藏都慢半拍
nuxt非常友好,它提供了fetch鉤子,還有nuxtServerInit,這兩個鉤子都運行在服務端並且我們能很快速地操作store
14. fetch的使用
如果頁面組件設置了fetch方法,它會在組件每次載入前被調用(在服務端或切換至目標路由之前),此方法需要跟服務端的人員配合
<script> export default { async fetch ({ app, store, params }) { let { data } = app.$axios.get(/token); store.commit(setToken, data.token); } } </script>
15. nuxtServerInit
終極無敵方法
import Vuex from vuex let store = () => new Vuex.Store({ state: { token: }, mutations: { setToken (state, token) { state.token = token } }, actions: { nuxtServerInit({ commit }, { req }) { let cookie = req.headers.cookie; // 將cookie轉成json對象(自己實現該方法) let token = cookieparse(cookie).token; commit(setToken, token); }, } }) export default store
16. 封裝屬於自己的全局方法
let xielikang = function () { /** * @method 列印信息方法 * @param {String} msg 信息 */ let message = function (msg) { msg && console.log(msg) } let otherfn = function (msg) {} return { message, otherfn } } Vue.prototype.$kang= xielikang
組件調用
<script> export default { created() { this.$kang.message(小老弟,你怎麼回事) } } </script>
對了,別忘了在plugins中配置,可以回到第7小節查看配置
17. 全局樣式
nuxt.config.js
module.exports = { css: [~/assets/stylesheets/main.min.css] }
18. 使用Element-UI
還是plugins文件夾新建element-ui.js
// 全局引入 import Vue from vue import ElementUI from element-ui Vue.use(ElementUI) // 按需引入 import { Button, Loading, MessageBox } from element-ui Vue.use(Button) Vue.prototype.$loading = Loading.service Vue.prototype.$msgbox = MessageBox
nuxt.config.js
module.exports = { css: [element-ui/lib/theme-chalk/index.css], plugins: [ { src: "~/plugins/element", ssr: true } ] }
18. 如何使用sass預處理器
安裝依賴
npm install node-sass sass-loader --save
組件中使用(不需要其他的配置了)
<style scoped> </style>
19. fetch、asyncData、validate使用範圍
只能在頁面組件使用,也就是pages目錄下的組件,而不是components目錄下的組件,要有所區分
20. 傳統部署
npm run build && npm run start
21. pm2部署
它允許您永久保持應用程序活躍,無需停機即可重新載入它們,並不需要傳統部署的.nuxt文件夾,該部署方法也跟生產環境一樣含熱更新
npm install pm2 -g
npm run build pm2 start ./node_modules/nuxt/bin/nuxt-start
本文到此就結束啦,這是目前踩的坑,如果有錯誤的地方,請大家指出
作者:白色風車kai
鏈接:http://www.imooc.com/article/details/id/79819來源:慕課網
推薦閱讀:
還在為機器學習煩惱嗎?請收好——10個常用AI開發框架
30行Javascript代碼實現圖片懶載入
Github上發布一天Star數破4K的項目了解一下
計算機科學與技術專業的學生要怎樣做才能避免成為 一個低級的碼農?
推薦10個Java方向最熱門的開源項目
為什麼程序員應該有一台Mac個人電腦
有哪些好笑的關於程序員的笑話?
【面經】2018-6次面試阿里,持續一個多月,終於有offer了!
Git使用教程,最詳細,最傻瓜,最淺顯,真正手把手教
推薦閱讀: